ACTWIDTH is a macro that tries to get actwidth from the active
SpaceAction (G.saction->actwidth). This should solve any potential
problems with having two action editors open editing shapekey
actions.

Also, I've fixed a compiler warning caused by erwin's constraint
commit. Wrong ui call for button.
Now time-markers work in all time-related spaces (i.e. Ipo,
Action Editor, NLA editor, TimeLine, Sound). The hotkeys and
functionality set should be the same for each of these modes
(with a few exceptions still). I've had to change a few hotkeys
here and there, so hopefully they aren't too bad.

Marker Operations:
MKEY - Add Marker
SHIFT MKEY - Rename marker (was CTRL MKEY)
XKEY - Delete Marker
PAGE UP - Jump to next marker
PAGE DOWN - Jump to previous marker
CTRL A - Select all markers
SHIFT G - Transform markers (NLA, IPO, Action)
G - Transform markers (Sound, Timeline)
CTRL SHIFT D - Duplicate markers (NLA, IPO, Action)
SHIFT D - Duplicate markers (Sound, Timeline)
BKEY - select markers and other keyframes (if any)

I've also made a few little tool additions to NLA and Action editors:
* NLA editor - Snap To Frame.
Now with the option to offset strip so that it starts at the current frame.
Added menus for this.
* Action editor - Snap To Frame
A few new menus for this too
Although we will delay the main Rigid Body user interface after 2.43 release early 2007, I need some constraint data/UI to make progress with COLLADA Physics.
Added RigidBody constraint UI
LR_ALTKEY+LR_CTRLKEY+LR_SHIFTKEY+ P will bake rigidbody
Contribution by RCRuiz, Ramon Carlos.
center, rotated according to face edges, and optionally with scale of the
face.

http://www.blender3d.org/cms/Face_Duplicator.828.0.html

Also: bugfix in undo/redo for relinking data to the UI. It was not checking
for Library data, accidentally linking non-library data with same names.
This adds the ability to restrict an individual object from:
- being visible in the 3D View
- being selectable in the 3D View
- being renderable
with 3 columns of buttons in the outliner.

These restrictions are further down the hierarchy than layers, so for example if an object is in an invisible layer, it will be invisible regardless of whether the object's own visibility setting is on or off. This works on a different conceptual level than layers, being better for more quick interaction (like temporarily making a mesh unselectable while you're posing its armature), rather than so much for scene organisation.

The 3 columns of icons can be turned off in the Outliner View menu.

Along with this is some small cleaning up in interface_icons.c and outliner.c.
All data layers, including MVert/MEdge/MFace, are now managed as custom
data layers. The pointers like Mesh.mvert, Mesh.dvert or Mesh.mcol are
still used of course, but allocating, copying or freeing these arrays
should be done through the CustomData API.

Work in progress documentation on this is here:
http://mediawiki.blender.org/index.php/BlenderDev/BlenderArchitecture/CustomData


Replaced TFace by MTFace:

This is the same struct, except that it does not contain color, that now
always stays separated in MCol. This was not a good design decision to
begin with, and it is needed for adding multiple color layers later. Note
that this does mean older Blender versions will not be able to read UV
coordinates from the next release, due to an SDNA limitation.


Removed DispListMesh:

This now fully replaced by DerivedMesh. To provide access to arrays of
vertices, edges and faces, like DispListMesh does. The semantics of the
DerivedMesh.getVertArray() and similar functions were changed to return
a pointer to an array if one exists, or otherwise allocate a temporary
one. On releasing the DerivedMesh, this temporary array will be removed
automatically.


Removed ssDM and meshDM DerivedMesh backends:

The ssDM backend was for DispListMesh, so that became obsolete automatically.
The meshDM backend was replaced by the custom data backend, that now figures
out which layers need to be modified, and only duplicates those.


This changes code in many places, and overall removes 2514 lines of code.
So, there's a good chance this might break some stuff, although I've been
testing it for a few days now. The good news is, adding multiple color and
uv layers should now become easy.
Here's the full release log with example file.
http://www.blender3d.org/cms/Render_Baking.827.0.html

For people who don't read docs; just press ALT+CTRL+B on a Mesh
with texture faces!

Todos:
- maybe some filter options extra?
- Make normal maps in Tangent space
- now draws on correct height
- selection is clipped correctly (did entire height)
- made showing scene markers default

Actually this implementation should have been a patch review... it was
done with entirely duplicating the code from timeline.c, whilst re-use
and generalizing markers has a preference. That way markers can become
supported in any time-based editor.

Will send an extensive review to Joshua Leung :)
and also fixes some further segfaults.

Now it is possible to 'surf' (jump) to different markers. This is only
possible through the hotkeys for this:
* Page Up - Next Marker
* Page Down - Previous Marker

These hotkeys match the ones in the timeline. In order to do so,
I've had to reassign two (rarely used/obscure) hotkeys:
* 'Ctrl Page Up' is now move selected action channel up (was Page Up)
* 'Ctrl Page Down' is no move selected action channel down (was Page Down)
I should also mention here that
* 'Shift Page Up' is move action channel to top
* 'Shift Page Down' is move action channel to bottom
- Weight paint options now also show in Nkey panel
- added uiNewPanelTitle() in interface API to rename panels. In use now
  for the Nkey panel title.
  (Note: original name is identifier, do not change that)
* There is now a feature to (de)select all markers. Can be found in menu or
via the hotkey Ctrl A
* The 'Markers' menu is now not drawn when marker set is 'None'
* Some other minor code cleanups

Additional Notes:
* I'm still trying to track down the cause of a bug which means that you can't
select more than one marker (with RMB clicks) at once. For now, just use
borderselect
Added a simple check to a number of editing operations. If multires is enabled,
an error is displayed and the operation is cancelled. This includes adding and
deleting verts/edges/faces, and anything that would reorder elements.
A Plumiferos wishlist item: Markers working in the Action Editor too.

* The user can choose between displaying the scene markers (i.e. the
markers shown in the timeline) or the markers specific to each action,
by using the next list box on the action editor header. This is specific
to each instance of the action editor.

* The display of the markers currently still needs improvement. At the
moment, the triangle icons + text are drawn below all the last row of
keyframes. As such, I've made it draw yellow vertical lines which
span the height of the action editor, to also indicate markers.
Comments on this and also help getting the triangle thingies to 'float'
above the bottom scroll bar are warmly appreciated.

* There are a few minor update issues with editing a marker in the
timeline and the markers in the action editor which will be fixed soon.

* There are also a few hotkeys to still add.

Enjoy!
Prob: selection sometimes gave wrong edges/faces

Selection code for editmesh was still using a short for calculating the
distance of a projected vertex/edge/face from the mouse position. In
zoomed in cases that'll give overflows and unpredictable results.

It was fixed only half before... now all shorts are removed for distance
calculus.
- Now works on selection of Objects (as do allmost all hotkeys)
- If multiple selected have different settings, it sets all the same
- Also does subsurf settings within a dupli-group
* IPO Curve Smoothing:
This new tool smoothes (i.e. resets the adjusts) the handles on selected
ipo curves in ipo editor. The core code is based upon a python script
that used to do this (author unknown).

- Available from menus
- Hotkey Shift O
- Only available from ipo editor

If the usefulness of this tool is limited (adding bloat), I will consider removing it.
now, others can be added later (sticky, shape keys). Beside one small fix
for knife exact vertex group interpolation, is intended to work the same
as before.

Also fixes bug #5200, related to editmode undo and vertex groups. And
corrects the editmode to faceselect mode selection conversion, that was
broken in a previous commit.
Major sequencer rewrite to add Speed Control effect.
Changes:
- Cleaned up large parts of sequence.c removing a lot of unnecessary code.
  (We first built old seqar array to decide, what is visible, then build
   dependencies with new code, then used old code to iterate through the
   strips and deciding using new code what is used and so forth and so on...)
  Should be much faster now.
- Now we build the strips recursively thereby elemenating the need of a
  seperate dependency calculation.
- Added a Speed-Control effect to change strip speed afterwards.
  (Offers global speed as well as IPO-controlled speed.
   There are several modes to play with:
   - Control by velocity (IPO = velocity where 1.0 is normal speed)
   - Control by frame number (IPO = target frame)
   - IPO-Value can be rescaled to frame-value, to make frame exact matching
     possible. (Matching video tracks to audio tracks with IPOs ;-)

Demo-Blend file is here http://peter.schlaile.de/blender/sequencer/speedcontroltest.blend

Since this was also a Plumiferos request I hope to be mentioned in the
credits ;-)

Enjoy! And please test the new sequencer thoroughly. It is really more like
a rewrite this time.
THE OBJECT PROXY

Or simple said; local control of referenced data from libraries.
Having library files with references is a very common studio setup, and
Blender did do quite well in that area. Were it not that for character
setups it was impossible to use still.

This commit will enable a full rig+character to remain in the library,
and still have - under strict control - local access for animation edits.

Full log:
http://www.blender3d.org/cms/Proxy_Objects.824.0.html
the CustomData module from the modifier stack rewrite, but with additions
to make it also usable in edit mode. Some of the datatypes from that
module were move to a DNA header file, they are not saved to file now, but
will be soon.

The only code that wasn't abstracted is the uv collapse / merging code. It
is rather complicated, will look into that in the future.

There should be no user level changes.
This adds support for "generator effect strips", which don't need necessarily
an input strip and my version of Matt Ebb's [ #5035 ] 'Solid Color'
sequence strip.

TODO: With a little bit more tweaking it will be possible to make animated
effect plugins and my still unfinished "Bake"-Strip.

For the 'Solid Color'-Effect, to quote Matt:
This is nice and simple, just provides a solid colour that's set in a colour picker in the properties popup. This is something we've needed for a long time, and I got totally sick of having to make 'black.png' and 'white.png' just to do fades, so I coded this.
Added enhancements by blendix (Patch #4919: Insert sequence effect between)

It adds the following things:
- You can add a sequence strip afterwards in the middle of an effect chain
  (you have to move strips around before, so that there is "room" for it.
   Blender will ask you then, if you want to add in between or after the
   selected strips)
- In the case you messed it up and want your effect strips to be reassigned in
  a different way, there is the new "R"-key. Just select three arbitrary
  strips and press "R". If you don't create a cycle, those will be connected
  to a new effect chain.
- Fixed freeing of imbufs on changes to properly take into account dependencies.  An example of a simple case that went wrong is one image strip with two
  glow effects, changing the parameters of the first glow strip will not
  result in any updates. Basically only direct dependencies were taken into
  account, which resulted in the image preview not being updated in some cases.
- Let the sequencer detect an active sequence strip if none is defined, to
  get rid of annoying error messages when trying to add an effect to a
  selected sequence strip right after loading a file.
- Delete is less destructive. If you delete somewhere between other strips,
  Blender now tries to relink in a reasonable way.
- The active sequence strip is now displayed with a light instead of a dark
  outline, which makes it easier to spot, and is especially useful for the
  tools using the active sequence strip.
- Ability to view the final result when editing inside meta strip.
  The channel button was modified to also allow negative numbers,
  where -n is n levels up the meta stack. There is probably a nicer way to
  specify this, instead of (ab)using the channel button, but this seems to
  work quite efficient.
- Also a small bugfix: don't crash on loading files from newer versions with
  an unknown effect strip.
#5061 - Ipo/Action 'Cleaning'
#5071 - 'Only Needed' Keyframing Option

====================

* IPO/Action 'Cleaning':
It removes un-necessary keyframes from individual ipo curves.
- In both editors, the hotkey is currently the OKEY.  Also accesable from menus of each editor.
- There is currently a 'threshold' popup. This sets the value that the cleaner uses to determine if two keys have same time/value

There are a few improvements that could still be made, such as:
- There are a few cases that it still doesn't handle yet, such as when un-needed keyframes lie on a linear line (and similiar cases). This shall be improved soon.
- Also, for some reason, after running cleaning while in ipo editor editmode, all but the active curve are hidden.

====================

* 'Only Needed' Keyframing Option:
This patch adds a new keyframing option for objects and bones. It only adds keyframes where they are needed, judging from the surrounding points on that curve.

Notes about this keyframing option:
- Works like the existing 'Avail' option, except it checks if the keyframe
is needed.
- Currently uses hardcoded threshold for determining if same value.

[quote]
/* Cases where keyframes should not be added:
*       1. Keyframe to be added bewteen two keyframes with similar values
*       2. Keyframe to be added between two keyframes with similar times
*       3. Keyframe lies at point that intersects the linear line between two
keyframes
*/
[/unquote]
Enable to use Xkey or DEL for deleting objects in outliner.

Note: there's reasons to be a bit reluctant with extensions like this.
Mostly related to the fact that outliner operations is completely unfinished
still. We need to spend time on thinking over how it should evolve, and
based on that the proper hotkeys and menus can be added as well.
This enables finding data in the Outliner.
Usage: Fkey (partial strings), CTRL+Fkey (partial strings, case sensitive).
SHIFT+Fkey to repeat a search, this cycles around.

Extra changes:
- button popups to enter strings now starts activated.
- outliner either shows for Armature the Bones, or Posechannels or
  Editbones,  depending the mode. Was needed to make searches meaningful.

Although Joshua did very good work on the key functions, there were a couple
of issues in his code, and problems in Outliner code, that didn't make it
all work nicely. So, this is quite a revised patch. :)

Full review log can be found in the patch tracker.
This patch adds a new option to the separate menu in editmode, 'By Material'.
It simply loops through all materials in the mesh selects the faces associated
with them and calls separate().

Thanks to Andrea Weikert for the patch!
Four more selection options in Curve editing;
- select more/less (ctrl+numpadplus/minus)
- select first/last point

All nice in menus and toolbox even!

Patch note: had to fix bugs in using 'continue' inside of while() loops.
Turned all oldstyle while() in for() for going over lists.
If you rename a Constraint, the used Constraint Channels (Ipo curves) were
not renamed as well, making animations not work anymore.

Now renaming works up to this level:
- own object constraints
- own object Action constraints

This is identical to Bone renaming. Note that other actions (like in NLA)
are not corrected for renaming. Have to look at ways to provide that once.
- FORWARD CYCLING & MATCHING
Up to no now, adding multiple actions in NLA with walkcycles required to
animate them standing still, as if walking on a conveyor belt. The stride
option then makes the object itself move forward, trying to keep the foot
stuck on the floor (with poor results!).
This option now allows to make walk cycles moving forward. By
indicating a reference Offset Bone, the NLA system will use that bone to
detect the correct offset for the Armature Pose to make it seamlessly going
forward.
Best of all, this option works as for cyclic Action Strips as well as for
individual Action Strips. Note that for individual strips, you have to set
the strip on "Hold". (Might become automatic detected later).
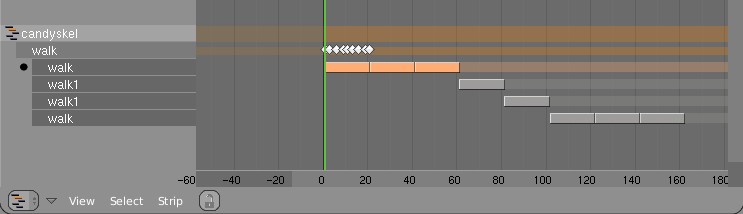
Here's an example edit image for NLA:
http://www.blender.org/bf/nla_match-cycle.jpg
And the animation for it:
http://download.blender.org/demo/test/2.43/0001_0150_match.avi
Blender file:
http://download.blender.org/demo/test/2.43/mancandy_matching.blend
Using this kind of cycling works pretty straightforward, and is a lot
easier to setup than Stride Bones.
To be further tested:
- Blending cycles
- matching rotation for the bones as well.
- ACTION MODIFIERS (motion deformors)
The above option was actually required for this feature. Typically walk
cycles are constructed with certain Bones to be the handles, controlling
for example the torso or feet.
An Action Modifier allows you to use a Curve Path to deform the motion of
these controlling bones. This uses the existing Curve Deformation option.
Modifiers can be added per Action Strip, each controlling a channel (bone)
by choice, and even allows to layer multiple modifiers on top of each other
(several paths deforming motion). This option is using the dependency graph,
so editing the Curve will give realtime changes in the Armature.
The previous walkcycle, controlled by two curves:
http://download.blender.org/demo/test/2.43/0001_0150_deform.avi
Blender file:
http://download.blender.org/demo/test/2.43/mancandy_actiondeform.blend
Action Modifiers can be added in the NLA Properties Panel. Per Modifier you
have to indicate the channel and a Curve Object. You can copy modifiers from
one strip to another using CTRL+C (only copies to active Object strips).
Setting up a correct Curve Path has to be carefully done:
- Use SHIFT+A "Curve Path" in top view, or ensure the path is not rotated.
- make sure the center point of the Curve Object is at the center of the
Armature (or above)
- move the first point of the curve to the center point as well.
- check if the path starts from this first point, you can change it using
(in Curve EditMode) the option Wkey -> "Switch Direction"
- Make sure alignment uses the correct axis; if the Armature walks into
the negative Y direction, you have to set in Object Buttons, "Anim settings"
Panel, the correct Track option. (Note; option will probably move to the
Modifier later).
This is a good reason to make such paths automatic (on a command). Is on the
todo list.
Also note this:
- the Curve Path extends in beginning and ending, that's (for now) the default,
and allows to use multiple paths. Make sure paths begin and end horizontal.
- Moving the Curve in Object Mode will change the "mapping" (as if the landscape
a character walks over moves). Moving the Curve in Edit Mode will change the
actual position of the deformation.
- Speed (Ipos) on paths is not supported yet, will be done.
- The Curve "Stretch" deform option doesn't work.
- Modifiers are executed *after* all actions in NLA are evaluated, there's no
support yet for blending multiple strips with Modifiers.
- This doesn't work yet for time-mapping...
This commit is mostly for review by character animators... some details or
working methods might change.
This feature can also be used for other modifiers, such as noise (Perlin) or
the mythical "Oomph" (frequency control) and of course Python.
Special thanks to Bassam & Matt for research & design help. Have fun!
Embryon functionnality for snapping.

- Only snaps to grid on translations (grab)
- Transform constraints are supported but header display is wrong.
- Can be turned on/off in the Object/Mesh header menu under Transform Properties (tentative spot, will have to integrate better and in other object type menus too)
- Can be turned on/off during transform with ` (Back Quote, also tentative)

This is, of course, very much Work in Progress.

This implements part of the structural ideas for the transform cleanup I've been juggling around with.
* added two files from verse-master
* server list is available in outliner (new mode "Verse Servers")
* verse sessions are now also in new mode "Verse Sessions" in outliner
* fixed drawing of verse sessions and their nodes
* in user preferences System & OpenGL master-server ip setting (default master.uni-verse.org)
* in File>Verse entry "Get Servers" to get server list or
* RMB on "Available Verse Servers" in outliner to "Refresh" server list

Enjoy :)
This patch adds the feature of IPO curve mirroring. It mirrors the selected keyframes in the active ipo curves over a user-nominated mirror-line.

Options are:
- Mirror over current frame
- Mirror over vertical axis (X = 0)
- Mirror over horizontal axis (Y = 0)

Functionality can be accessed from:
- Hotkey M in IPO editor
- Submenu in header of IPO editor
Some operations like edge loop deselect would cause selection history
to become invalid. Added a sanity check to countall() to try and catch
these when they happen.