The Preview panel in UV window, for compositing, sets a 'crop' flag in the
scene when used. Somehow this flag can hang when you switch screens or
close windows. Or even worse, it crashed on renders.

This commit ensures that the compositor survives and gives error prints.
The real issue, hanging flags on closing windows, has to be solved still.
Displace modifier crashed when used on Curve, the fix removed the flag
that accepts curve objects, but apparently then a flag to accept meshes
has to be added. (eModifierTypeFlag_AcceptsMesh).

Thanks Michael Crawford for notifying this fix.
grouped and become a new duplicated group, and so on.

IMPORTANT NOTE!
- no check for eternal loops, so I've hardcoded limited it to 5 levels
- no support for animation or deformation/modifiers/constraints

So, only fun for the props and architecture department :)
duplicate code. Also removed redundant files from the bsp module,
that where replaced by boolop last year, no sense in updating them
for these changes. On the user level things should still work the
same, this is only preparation work.

Not counting the removed files, -1501 lines of code, not too bad :)
http://download.blender.org/demo/test/2.43/0001_0150_speed.avi
  By default the Speed maps in the range 0-100 frames, since there's
  not an actual time relationship here.

  IMPORTANT: this didn't work before, and default Curve Paths have a
  speed Ipo, so past saved scenes will work different now!

- Speed curve points are now drawn on the 3D path as well. With select
  info for selected points, if Curve Object is active.

- Duplicating Objects with NLA ActionModifiers now also correctly copies
  object pointers, so a duplicate works as expected.
This was a sculpt mode merge problem: the G_DRAWSHARP and G_SCULPTMODE flags
had the same value, so Blender thought it was in sculpt mode when "Draw Sharp"
was turned on, leading to segfaults.

I have moved the G_SCULPTMODE flag to an unused value.
#4742 exported normals are now correct
  #4821 & 4956 for complex movements in/outflows can now also
  use the animated mesh option
- new features
  * isosurface subdivision: directly
    creates a finer surface mesh from the simulation data.
    this increases simulation time and harddisk usage, though, so
    be careful - usually values of 2-4 should be enough.
  * fluidsim particles: extended model for particle
    simulation and generation. When isosurface subdivision is enabled,
    the particles are now included in the surface generation,
    giving a better impression of a single connected surface.
    Note - the particles are only included in the final surface
    mesh, so the preview surface shows none of the particle
    effects.
  * particle loading: different types of particles can now be selected for
    display: drops, floats and tracers. This is a bit obsolete
    due to the extensions mentioned above, but might still be useful.
    Floats are just particles floating on the fluid surface, could
    be used for e.g. foam.
  * moving objects impact factor: this is another tweaking option,
    as the handling of moving objects is still not conserving
    mass. setting this to zero simply deletes the fluid, 1 is
    the default, while larger values cause a stronger
    impact. For tweaking the simulation: if fluid disappears, try
    increasing this value, and if too much is appearing reduce it.
    You can even use negative values for some strange results :)
- more code cleanup, e.g. removed config file writing in fluidsim.c,
  added additional safety checks for particles & fluidsim domains (these
  currently dont work together). I also removed the "build particles"
  debug message in effects.c (seemed to be unnecessary?).

Some more info on the new features:
Here are two test animations showing the difference between
using the particle generation with isosurface subdivision.
This is how it would look with the old solver version:
http://www10.informatik.uni-erlangen.de/~sinithue/blender/fluid6_fl6manc4_1noparts.mpg
and this with the new one:
http://www10.informatik.uni-erlangen.de/~sinithue/blender/fluid6_fl6manc4_2wparts.mpg
Both simulations use a resolution of 64, however, the version with particles
takes significantly longer (almost twice as long).
The .blend file for a similar setup can be found here:
http://www10.informatik.uni-erlangen.de/~sinithue/blender/fluid6_testmanc4.blend
(Minor Tips for this file: dont enable subdivions of characters until rendering,
thus leave off for simulation, as it uses the rendering settings! For making
nice pictures switch on subdivion, and OSA.)

And here's a picture of old vs. new (for webpage or so):
http://www10.informatik.uni-erlangen.de/~sinithue/blender/fluid6_manc4compare.png
Deleting all points in a Curve object created empty DispList blocks. The
drawing code didn't like that.
Secured it by both fixing drawing as skipping adding empty DispLists.

Special thanks to Fernando Bastos for the extensive stack tracing.
Dupli-group doesn't work yet for metaballs. Code entered an eternal loop,
because the group-duplication code calls again the metaball creation code.

Disabled this. MakeDisplist needs review!
Apparently being so scroogish for cpu cycles makes crashes in Linux. I'll
add it on todo for later checks, but I need a windows or linux coder for
it!

For users: it might fix crashes when you have NodeTrees in Libraries.
The "Copy Size" constraint was calling a where_is_object(), this caused
the depsgraph to mess up in very weird ways and rare occasions. In the
sample file it showed strange lags in bones for using the "Stride bone"
option.

While trying to locate the bug I've revisited the Pose depsgraph in detail,
trying to figure out how it can print possible cycle errors in dependency.
That has been added now too (in console). Unfortunately the bugreport
example had no cycle errors. :)
Clear transform (ALT+G/R/S) in Pose sometimes didnt work, for example when
armature is being controlled by other armature. Caused by double depsgraph
flushing.
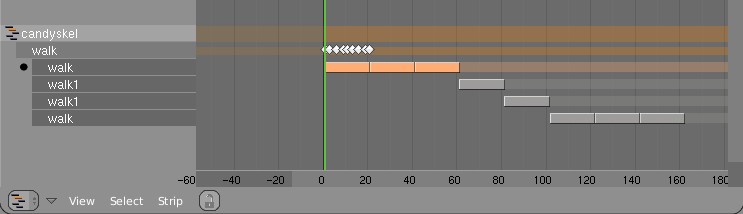
- FORWARD CYCLING & MATCHING

Up to no now, adding multiple actions in NLA with walkcycles required to
animate them standing still, as if walking on a conveyor belt. The stride
option then makes the object itself move forward, trying to keep the foot
stuck on the floor (with poor results!).
This option now allows to make walk cycles moving forward. By
indicating a reference Offset Bone, the NLA system will use that bone to
detect the correct offset for the Armature Pose to make it seamlessly going
forward.

Best of all, this option works as for cyclic Action Strips as well as for
individual Action Strips. Note that for individual strips, you have to set
the strip on "Hold". (Might become automatic detected later).

Here's an example edit image for NLA:
http://www.blender.org/bf/nla_match-cycle.jpg
And the animation for it:
http://download.blender.org/demo/test/2.43/0001_0150_match.avi
Blender file:
http://download.blender.org/demo/test/2.43/mancandy_matching.blend

Using this kind of cycling works pretty straightforward, and is a lot
easier to setup than Stride Bones.

To be further tested:
- Blending cycles
- matching rotation for the bones as well.

- ACTION MODIFIERS (motion deformors)

The above option was actually required for this feature. Typically walk
cycles are constructed with certain Bones to be the handles, controlling
for example the torso or feet.
An Action Modifier allows you to use a Curve Path to deform the motion of
these controlling bones. This uses the existing Curve Deformation option.
Modifiers can be added per Action Strip, each controlling a channel (bone)
by choice, and even allows to layer multiple modifiers on top of each other
(several paths deforming motion). This option is using the dependency graph,
so editing the Curve will give realtime changes in the Armature.

The previous walkcycle, controlled by two curves:
http://download.blender.org/demo/test/2.43/0001_0150_deform.avi
Blender file:
http://download.blender.org/demo/test/2.43/mancandy_actiondeform.blend

Action Modifiers can be added in the NLA Properties Panel. Per Modifier you
have to indicate the channel and a Curve Object. You can copy modifiers from
one strip to another using CTRL+C (only copies to active Object strips).

Setting up a correct Curve Path has to be carefully done:
- Use SHIFT+A "Curve Path" in top view, or ensure the path is not rotated.
- make sure the center point of the Curve Object is at the center of the
  Armature (or above)
- move the first point of the curve to the center point as well.
- check if the path starts from this first point, you can change it using
  (in Curve EditMode) the option Wkey -> "Switch Direction"
- Make sure alignment uses the correct axis; if the Armature walks into
  the negative Y direction, you have to set in Object Buttons, "Anim settings"
  Panel, the correct Track option. (Note; option will probably move to the
  Modifier later).

This is a good reason to make such paths automatic (on a command). Is on the
todo list.

Also note this:
- the Curve Path extends in beginning and ending, that's (for now) the default,
  and allows to use multiple paths. Make sure paths begin and end horizontal.
- Moving the Curve in Object Mode will change the "mapping" (as if the landscape
  a character walks over moves). Moving the Curve in Edit Mode will change the
  actual position of the deformation.
- Speed (Ipos) on paths is not supported yet, will be done.
- The Curve "Stretch" deform option doesn't work.
- Modifiers are executed *after* all actions in NLA are evaluated, there's no
  support yet for blending multiple strips with Modifiers.
- This doesn't work yet for time-mapping...

This commit is mostly for review by character animators... some details or
working methods might change.
This feature can also be used for other modifiers, such as noise (Perlin) or
the mythical "Oomph" (frequency control) and of course Python.

Special thanks to Bassam & Matt for research & design help. Have fun!
settings, rather than using the object's TrackX/Y/Z/etc buttons.

 This is good for two reasons: a) having the settings over in the object buttons
 before was terribly unintuitive and hidden, now it's more visible how to
 control the deformation, and b) now if you have more than one curve modifier,
 they can have their own settings, instead of being forced to use the object
 level data.
Especially for Compositing it was annoying that colors always got clipped
in the 0.0-1.0 range. For this reason, extrapolated Curves now is the
default. Old saved files still have horizontal extrapolation.

Set the option with 'Tools' menu (wrench icon). This is a setting per
curve, so you might need to set all 4 curves for an RGBA curves widget.
input nodes was 'passing on' the buffer (because it didn't operate on the
image). That's for example for Blur with size 0 or for Translate node.
This passed-on buffer then got freed inside the group...

Solution now is just a malloc. Better system should be devised, with
reference counting or so. Thanks Ivan Hoffmann for the sample file!
- Icon previews for Images were created always for old files, which made
  browsing (menus) incredible slow. Added a minor change in the flow, so
  icons only get created when the user invokes loading images.
  Andrea; you might check this, probably not al cases are covered yet?

- Compositor: the 'File Output' node now has a min/max frame for which it
  writes files

- Compositor: fixed a very bad bug (even in 2.42a release) that made the
  depsgraph for nodes not work... while editing, only the nodes that change
  should be recalculated, but accidentally all of them were done each time.
SB collision targets may be picked up from modifier stack
works fine with static targets having subsurf and/or array mofifiers
see-->
http://www.wund.homepage.t-online.de/hidden/Mstack.blendhttp://www.wund.homepage.t-online.de/hidden/Mstack_II.blend
however when calulating the SB object dynamics the vertices of the
'deform only' m-stack result are used
so SB <-> SB may look strange
subsuf modifier is applied to SB object after doing SB dynamics
(that is: colliding mesh is subsurfed, SB is not )
subsurfed SB cubes colliding
link --> http://www.wund.homepage.t-online.de/hidden/ColSelfMod.blend
or may give unwanted results
subsuf and array modifier is applied to SB object after doing SB dynamics
link --> http://www.wund.homepage.t-online.de/hidden/ColSelfMod_nobug.blend
last, modifiers that change vertex locations in time (like waves)
suffer from not beeing seen at needed time resolution
(SBs see colliders static in a frame)
well but that's beyond the limits of the current dep-graph use
and needs to be resolved on design level
anyhoo have fun
BM
Duplicating a Library-linked Mesh with Library-linked texture Images forgot
to set the texture Image link flag to LIB_EXTERN (LIB_INDIRECT means the ID
is not saved in file).

Error was that a the duplicated Mesh lost texture.
http://www.blender3d.org/cms/Shadow_buffer__Halfway.786.0.html

Simply said: by using the average of the nearest and 2nd nearest Z value
in Shadowbuffers you can reduce bias errors very well.
For backwards compatibility it is a new buffer type though.
Full log:
http://www.blender3d.org/cms/Irregular_Shadow_Buffe.785.0.html

In short: this is a shadow buffer approach that always results in crispy
shadows, independent of lamp buffer size or zoom level. This shadow buffer
system also supports transparent shadow.

This is part of work on refreshing Shadow Buffers in Blender. You now can
choose of two types (Classical, Irregular). More types will follow. Also
quality issues for Classical shadow buffers are going to be reviewed,
especially to solve the lousy Biasing.

For the CVS log record; it is based on articles:
Gregory Johnson et al, University of Texas, Austin. (Regular grid method).
Timo Aila and Samuli Laine, Helsinki University of Technology. (BSP method).
nicer kinematics in self collision -> blending to complete inelastic impact
now does something close to real physics

first steps towards aerodynamics
anisotropic friction
springs 'see' their movement in media
--> see surrrounding  media does not move and/or reacts on wind
(*for now  needs to have a pseudo collider araound  -> that is: add a cube in the same layer
and make it a deflector  *)
* print (# servers) instead of icon row when there are servers in the list
* dark-green circle behind server icon in server list when connected
* orange when connecting